If you want to know how to open an Amazon seller account, keep reading this article as we explore the step-by-step process involved in being an account holder on Amazon.
Over the years, Amazon has continued to keep its position as the number one online retail store and the most popular among consumers. The company grows significantly through different inventions such as new products, acquisitions, and other mouth-watering services to help sellers optimize their profit. As the company grows, so are the myriads of opportunities to develop successful e-commerce on the website.
Also, the number of digital buyers is at 214.4 billion presently. These statistics only confirm one thing – the digital retail sale is gradually taking over and becoming an integral part of consumers’ lives. There has never been the right time to start an e-commerce business than now. The right place to do that is on Amazon.
Aside from being the most popular digital market, Amazon is a trusted website where consumers feel safe to trade. For instance, about 89% of consumers prefer to buy from Amazon than any other e-commerce site. In 2020 alone, the company acquires about $125,6 billion in sales revenue in the first four months of 2020.
Now that you know this much about Amazon and its role in the e-commerce business let us go straight to how to open an Amazon seller account.
How to Open an Amazon Seller Account
By now, it is assumed that you already know the product you want to sell. So, the next step is to go through the Amazon seller registration process.
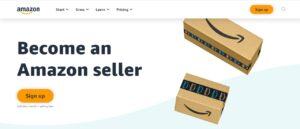
- First, go to https://services.amazon.com. The result of the search should look like the below picture.

(Source: Amazon)
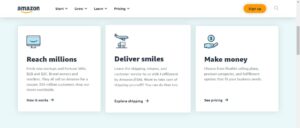
2. Next, you scroll down the page to just right below the tag “Become an Amazon Seller.” Then look for the heading “See pricing” (below the ‘Make Money’ heading) on the right and click it.

(Source: Amazon)
Note that the orange sign-up button is for professional sellers. However, the ‘See Pricing List’ shows you the difference between the individual and professional accounts to decide depending on your needs and business goals.
Individual or Professional seller account
As a potential seller on Amazon, you need to choose between an individual account or a professional account. Is there any difference between the two? Yes. The difference is in the number of products you plan to sell in a month.
Professional Seller: If you plan on selling a large number of products, let’s say 40 units in a month, then the professional package is for you. It costs $39.99 per unit sold in a month irrespective of the products you sell in a month, and it has some benefits, including:
● You can top placement on product detail pages.
● You can use advanced selling tools, like APIs and reports.
● You can sell products in restricted categories.
● You can also advertise your products to optimize your sales.
● You can run promotions, including shipping.
● You can add many users to your account.
Individual Seller: The individual seller is for small business owners who plan to sell below 40 units per month. Also, this is for you if you are still deciding what to sell and you don’t intend to advertise. It costs $0.99 per unit sold in a month.
Input Your Email Address and Create New Account
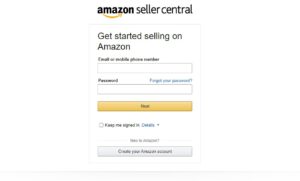
Once you choose a suitable seller account, the following image will request you to enter your email address and a password of your seller account’s choice. Once you do this, click on the Next button.
This step should take you to another screen asking you to input in a one-time password (OTP) generated by Amazon, which will be sent to the email address you provided in the previous screen. It is Amazon’s way of taking extra precautions to verify if the email is yours.
Within a few minutes, you should see the OTP in your email address. After adding the OTP to the space provided, click the ‘Create your Amazon Account’ button.

(Source: Amazon)
Choose a Business Location and Business Type
The next step is to produce the following information:
● Business Location: This indicates the country where your business is. It is vital to provide accurate information as Amazon will be verifying it (you will see that later in this article).
● Business Type: There are different business types, but most businesses fall under the privately-owned.
a. State-owned business
b. Publicly-owned business
c. Privately-owned business
d. Charity
e. Individual
● Full Name: Input your first, middle, and surname, respectively.
After putting in all the details, click on the ‘agree and continue button.
Provide Some Personal Information
Here, Amazon will request your identification number from your passport or any other recognized means of identification. You will also provide your phone number. Click on next after entering the information.
Marketplaces
The marketplace is right next to the personal information section, and it refers to the location of an Amazon store in which you’d like to sell. Amazon currently has nineteen marketplaces, For instance, Amazon.co.uk, Amazon.ca (Canada), Amazon.us (United States), and Amazon.ae (United Arab Emirates). Click ‘next’ after filling this.

(Source: Amazon)
Enter Billing Information
This section is where you enter your billing information. It is another way Amazon verifies the identity of their potential seller. Here, you input your credit card details such as the number, expiring date, and the name on the card. Wait for your card to be validated, then Move on to the next screen after this.
Store
The store is where you answer a few questions about your Amazon store and the products you plan to sell. The questions are the following:
● The name of your store on Amazon
● You have UPCs for your products. UPC stands for universal product code.
● Whether you are the producer or the brand owner/agent/representative of the products you plan to sell
● If you have a government-registered trademark for the products
Click next after filling in these details.
Address Verification
Address verification is the last page of the form where you will provide the business address you provided in stage 6. Provide the address and click on the ‘confirm’ button. If it tallies with the address you provided in step six, you should see a new screen. The information says you will receive a postcard at that address with your verification code. It takes seven days for the code to arrive, and you can track it.
When you receive the card at the mentioned date, enter the code into the ‘Enter code Below’ and click the next button to wrap up your verification. Once you are verified, you can log into https://sellercentral.amazon.com to start selling right away.
Amazon Fees
If you want to know how to open an Amazon seller account, you should familiarise yourself with their prices.
● Amazon referral fees: This refers to the commission Amazon takes from you for selling on its online store. The commission includes the item price, shipping cost, and any gift-wrapping charges. Also, the amount depends on the product category. A typical referral fee varies between 8% and 15%.
● FBA fees: FBA stands for Fulfillment by Amazon. If you use this service, it means you will pay for the picking, packing, and shipping costs of the product to Amazon. You can decide to ship your product yourself if you want. The price ranges from $1.97 for small items of no more than one pound to $137.32 for large items.
● Individual Seller: The individual fee goes for $0.99 for each sale you make in addition to the referral fee.
● Other Fees: There are additional fees, such as long-term product storage fees, advertising, premium account service, media fees, high volume listing fees, Amazon-partnered carrier program.
Other Things You Should Know About Amazon
Amazon Best Seller Rank: Amazon assigns a ‘best seller’ tag to a seller whose item is popular among consumers.
Amazon Prime: Amazon prime is a package plan that offers customers premium services yearly or monthly for a fee. If you are an Amazon FBA user and have enough products to share through the fulfilment network, your product may qualify for Amazon prime.
Amazon Prime can optimize your sales in a way you don’t imagine. It means your products will get to the customers in 2 – 3 days. You will also get the ‘Amazon Prime’ badge which makes consumers trust you better, leading to maximum sales.
Conclusion
Now that you know how to open an Amazon seller account, it would be better if you start right away. That is because the digital world, including e-commerce, moves faster than we can imagine. It is a convenient way of making money as you do not need to see the other person before transacting.
One of the digital stores making waves is Amazon. It has helped many consumers make a decent living just by exchanging products and services. Once you know how to open an Amazon seller account, you can start making sales on Amazon.
